

Failproof 5-ingredient homemade Low FODMAP dutch oven bread recipe. Crunchy on the outside, soft on the inside. For bread machine or by hand.
One of the biggest challenges of the Low FODMAP diet is that, at least during the first phases, we have to stop eating regular bread. It’s not so much because of the gluten, but because of the fructans in wheat bread.
You regularly ask me for bread recipes that look like real bread. Well, after 7 years of trying breads, I finally got it!!!
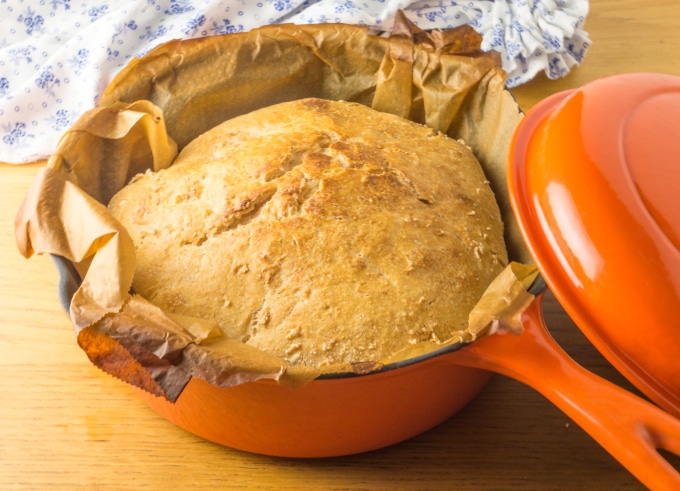
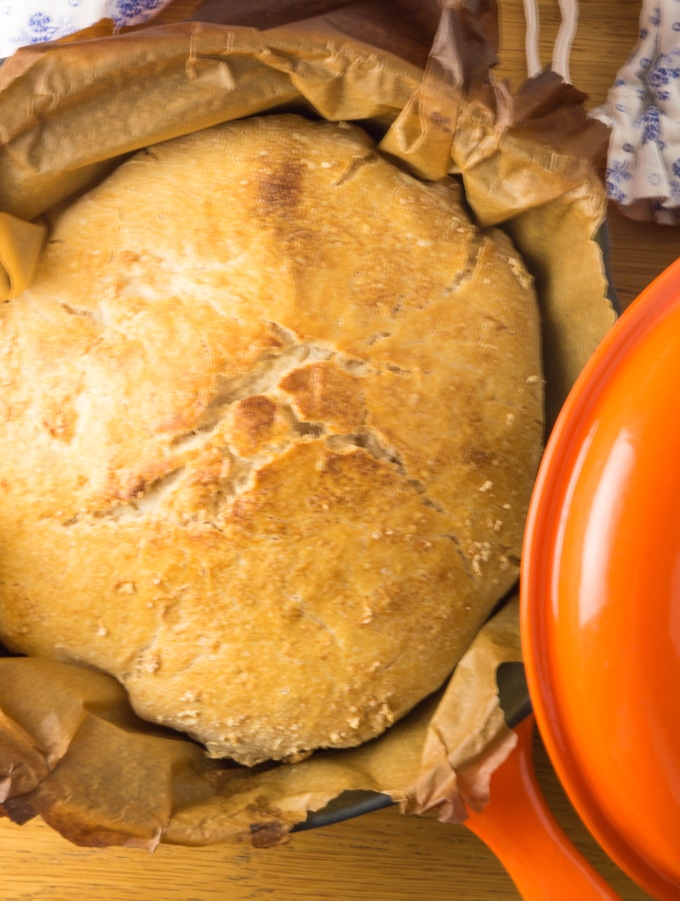
This low FODMAP dutch oven bread is the closest I’ve ever been to a normal bread for 3 reasons:
- the crust is crunchy
- the crumb is soft and airy
- and it tastes great!
And the secret to this low FODMAP bread is…
…..to bake it in a pan with the oven at high temperatures. And it’s not a new idea! Surely you remember the famous and viral no knead bread.
For better results I recommend a cast iron pan. A stainless steel pan(no plastics), an oven-proof glass dish with a lid or a cake tin well covered with aluminum foil will also do the trick.
And if you liked this recipe, take a look at this low FODMAP bread recipes collection.
Low FODMAP Dutch Oven Bread
Ingredients
- 11.8 fl oz | 350ml water
- 1 tbsp olive oil
- 21 oz | 600g all purpose gluten free and low FODMAP flour blend
- 1 tsp salt
- 0.35 oz | 10g dry yeast
Instructions
- Place all the ingredients in the bread machine or in a large bowl if done by hand. Start by adding the water (if done by hand, water must be warm) and oil, followed by the flour and salt, finishing with the yeast.
- In the bread machine – Use the 1h30 program that kneads and leavens (Exo. Kenwood program 10). After 5 minutes, use a spatula to peel off the dough from the edges.
- By hand – Mix the ingredients well by hand for a few minutes and knead into a ball. Let the dough rest for an hour and a half, covered with a kitchen towel.
- Place a covered pan in the empty oven (without dough) and preheat to 480ºF | 250ºC (approx. 20 min). Once the time is up, remove the pan and cover with parchment paper (be careful not to burn yourself). Place the dough, cover and return to the oven. After 30 minutes, remove the lid and let the bread brown for approximately 15-20 minutes or to taste.
- Like all gluten-free breads, it dries quickly. I recommend slicing and freezing. A few minutes before consuming, defreeze in the microwave and / or toast and you're ready to eat!
I’d like to double check the measurements, my dough was very dry (crumbly in fact) and I ended up adding more water. I wasn’t sure what the consistency should look like when you set it aside to rest.
Thanks!
Hi Kim. It’s usually pasty-liquid. What kind of flours did you use? Some rice flours absorb too much water.
Hi Joana, I’d like to know whether you could use oat flour for this recipe?
Hi Lucy! You’ll need a gf flour blend. Only oat flout won’t do the job. You’ll also need some starch.
What are the dimensions of your pot? I’m trying to figure out what pan to use. Thank you.
Hi Alene! My pot measures 23cm, 9 inches. Hope you like the recipe 🙂
The flavor is good, but I have two constructive criticisms: 1. In the U.S., the Schar Gluten Free flour is hard to find and expensive on Amazon. The loaf cost me over $18 USD. I’ve purchased some alternatives, so I’ll have to try the recipe with them. 2. The yeast didn’t seem to activate, producing a very dense bread. I think the recipe needs to specify to be sure to add warm water, if making by hand (bread machine heats everything). I used filtered water from the fridge, so it started out cold, then I put it in the microwave for one minute, but I don’t think it heated up enough…
Hi Katie, thank you for your comments and suggestions. Indeed, water must be warm to activate the yeast. I’ve added a note in the recipe.
I’m new to the Fodmap concept. I’m in the US and not sure what ingredients are contained in gf flour blend?
It always depends on the brand. Monash University tested the blend with rice flour, potato and tapioca starch. Try to find one with these ingredients and you’ll be safe.